Showing posts with label how to. Show all posts

Saturday

How to make people like you!


I want to share with you my thoughts on how to make people like you. I have been asked many times "how do I make friends?" or my favorite is "How do I make people like me."
The truth is you don't. You don't "make" people like you, they just do, like you, that is.
I would love to understand, how many people look down on themselves, I mean maybe that person isn't worthy of your friendship. Maybe, you should take a step back and say I deserve better then this person in my life.
If someone makes you feel bad or negative about yourself then they aren't your real friend and you shouldn't be stressing yourself about how to make them like you.

Make them like you.

If you have to make someone like you, then that friendship holds no value.
If you are changing your own thoughts, views and opinions to keep this person in your life, then something isn't right here.If they are causing you to lose yourself to gain them as a friend, then their friendship is false.

Self confidence.

I am not telling you to become a tyrant, but I am asking you to never forget your self worth.
Always remember who you are, where your going as well as where you came from.
You are a very special being, after all there is only one like you, there is no other.

Be true.

Be true to who you are. Your likes, dislikes and everything in between. Don't change for anyone, but yourself. You have to live with yourself for the rest of your life, 24 hours a day, 365 days a year for the rest of your days, don't lose one day of your life for someone who doesn't value you.

True or false.

A true friend will be there in good and bad times. They will not only listen, but actually hear what you have to say. This doesn't mean they have to understand or agree with you. A real friend will listen to you and tell you the truth by saying "I have no idea what you just said" or "I don't agree, but that's your view on the matter."

I don't want this post to drag on forever so in closing I am going to leave you with this.

Be you in all that you do. Let those around you see what they are missing. Know who you are and if you don't know that yet, that's o.k. We spend all our lives trying to find out who we are, why throw it all away on someone who doesn't appreciate it?

That's just my two cents on the matter.


Follow on Bloglovin


Tuesday

Benefits of the Elf Brush Shampoo

We all love our brushes, they are the most important tools any makeup junkie can have.

They help me create my looks as well as make the ritual of putting on my face so much easier.

I don't know where I would be without my coveted brush collection. Cheap or expensive I love them all.

To keep my brushes in like new condition I wash them weekly.

As I have been doing this for years now, I have begun to dread brush washing day.

It hurts my back sitting at the sink for 45+ minuets.

I did the olive oil and antibacterial soap mixture, but sometimes it would leave my brushes feeling oily and I would have to rewash them the next day. And the drying time with this mixture I didn't care for either.

I was looking for something new, something to make my weekly ritual easier.

On a resent trip to Walmart I picked up a bottle of the Elf Brush Shampoo.


I used this shampoo on all of my brushes that were dirty at the time cheap and expensive. I found that the formula is watery and I was a bit worried, but I continued anyway.

When I really noticed what this shampoo can do was with my MAC 219 brush, the small white brush.

I had some electric blue shadow on it, I thought okay this $3.00 shampoo ain't gonna do crap on this brush.

I was gladly mistaken. It became white as snow once again. The product claims to be antibacterial, removing all traces of makeup from your brushes. And it does!!

After washing I laid them out to dry using my Brush Guards for the larger brushes and laying flat the smaller ones, such as the 219 brush.

About 4 hours later I needed the space I put my brushes on to dry, so I picked them up to move them and noticed they were completely dry! I got a little nervous thinking, okay I messed up all my brushes, it's over!
upon checking them I realized they were all dry and in better condition then then before the washing!

I truly love this brush shampoo and will continue to use it.

Benefits of the Elf  Brush Shampoo.

1. It is watery so you won't need to add that much water.
2. It works quickly no need to over work your brushes.
3. quick drying time, washed and rinsed well in the morning, ready for a evening out.
4. Packaging is easy for travel and dispensing is very controllable.

Thanks for reading and have a great day!
If you enjoyed this post, please like and share or leave me a comment
I would love to hear your views on this amazing product!


Monday

On a personal note

There is something I want to share with you all, something personal, something special to me.
And that is the other side of blogging, the ins and outs the ups and downs.

And I feel that I cannot do that here since this is a beauty blog, I feel it wont be right to combine the two, it may get confusing to the readers and they may not want to know about my personal journey as a beauty blogger.

So I created a personal blog to share my journey as a beauty blogger, wife, mom woman with you all.

This blog will help other bloggers with tips and advice on creating and setting up their blogs and well as all the things I go through to keep themakeupsquid.com going.


I would love for you to check it out and share your insight with me and also I will be able to answer any blogging questions you may have. Hope to see you there.

Thanks for reading and have a great day!


Sunday

4 reasons to use a High Definition Powder


HD powders come in a universal shade that works with any skin tone.
Not only do they make the skin look radiant on film it also sets your foundation  and matifies
your skin without changing its natural contours.

This powder can be worn over and foundation or alone.
It is a silicone based formula the blurs pores for a flawless look.


This powder is finely milled therefore is is naked to the naked eye and film.

This product is meant to be used lightly in a simple dusting motion.
If not you will have a filmy residue and it will show up in photos especially with a flash.


As you can see in the photo above applied heavily with flash photography
it shows up giving off a white film on the skin.


Applied lightly and blended well it gives the skin a lovely radiance as promised.

I have been using HD powders for a few years now and I honestly don't think I can go back.

HD Powder Points

1. It's universal for all skin tones
2. Very light feeling formula not caking at all.
3. Blurs and softens the look of pores
4. A little goes a long way

The only down side to this product is that the packaging does not contain
the power very well. It can and will go everywhere if opened carefully.

There are two HD powders that I use often.

Elf HD Powder
$6.00

Make Up For Ever HD Powder
$36.00

The price range on these two powders is extremely different
But I will tel you the MUFE powder is more finely milled.

I use the Elf HD Powder for daily use and the MUFE HD Powder for more special occasions.

Have you tried a HD Powder?

Thanks for reading and have a great day!


Friday

My Contour and Highlighting Technique

Hello! Well This is going to be a bit different, Lately I have been on this mission in finding new ways to use old products or use products in a way that the makers of said products did not intend. Why, do you ask? Because I'm a Squid and this is what I do :) Today I am going to be sharing products that I use in the exact opposite way they were intended to be used.


COVER FX: Total Cover Cream Foundation
Sephora.com says:
What it is:
An antioxidant-rich, two-in-one foundation and concealer offering broad spectrum SPF 30 protection with medium to full, buildable coverage.
What it does:
This foundation provides an all-day radiant finish that nourishes and protects with anti aging benefits. The buildable formula can provide medium to full coverage and offers SPF 30, full UV protection, and all-day wear. This clinically tested product does not contain gluten, mineral oil, or talc.

But that's not what I do with it! I use this guys as a highlighter when I am contouring and highlighting my lovely mug. It goes on nicely and I don't have to use much. It is way lighter then my natural skin tone but blended out it make for a nice concealer/highlighter follow with a face powder of your choice and you are good to go!


BENEFIT COSMETICS: Hello Flawless!' SPF 15
Sephora.com says:
What it is:
A custom powder cover-up with a natural finish that builds from sheer to full coverage.

What it does:
Benefit "Hello Flawless!" SPF 15 is a blendable powder foundation with SPF 15 that goes on beautifully sheer and layers easily for customized coverage. Find your perfect shade and sweep it on with the accompanying brush for a sheer, natural finish; or apply with the sponge for full coverage or spot cover-up.


Now this shade "Nutmeg" is absolutely to dark for me. But! As a contour shade he is perfect. He blends amazingly well. He is a high coverage product so a little goes a long way and he comes is a wide variety to match any skin tones.

I find that using these two products together is just heavenly. I have provided a Video below as a demonstration on how well they work together.


I am using the Airbrush collection brushes from Sephora

I purchased all products myself :)
Please Comment, Like and Subscribe!

Thanks for reading and have a great day!


Understanding Your Beauty Blogger


Beauty bloggers try out new makeup and beauty products, write a posts on the products and then sit there and wait for your comments. NOT!!

Many beauty bloggers don't just blog all day. Some have work, families, spouses, partners, pets and a million other things they do besides blogging. 

On average every beauty blogger has at least 8-10 blogs they themselves follow. 
That means 8-10 
posts they read and comment on every other day. 
Tweets that need to be retweeted.
Instagram pics need to be liked.
Facebook statuses need to be updated.
Emails need to be read including junk mail!
YouTube videos need to be watched and commented on.
And If you are associated with another affiliate site them double that!

These things are all needed to stay up to date in the beauty blogging community.

Not including the interruptions while doing all of this, the Kids, Pets, Husbands,Wives, Partners,  Neighbors, Family, Friends, heck even food can be a problem.

So If your beauty blogger doesn't respond right away don't fret! It's probably a sock that got stuck in the washing machine or the baby putting his toys in the heating vent. He or she hasn't forgotten about  you!

Beauty bloggers aren't fashion models with stacks of makeup products laying about. Wow that sounds amazing! Sadly that isn't the case.

They are everyday people just like you, who seem to have a passion for something they love writing about and sharing with you and the world. 

Posts take time to write, taking photos, editing photos, creating a header, deciding on a title, making sure all the links are correct, Trying to figure out how to describe the color green or the feeling of the newest face product.

For example this post has been in my head for over a week now. Going over, how should I word it? What is the message I am trying to send? What do I want it to mean to the reader? And so much more!

Beauty bloggers come in all shapes, sizes and colors. Find one or twelve that you feel connected with.
One who feels the same as you do about certain things. You don't like MAC products? Find a Beauty Blogger who doesn't use MAC. Your a drug store only makeup junkie? find a drug store Beauty Blogger.

You have to understand your beauty blogger. So the Beauty blogger can understand you and your wants, needs and expectations.  

So please be kind, be patient, be understanding to your beauty blogger. We are people too :). 

Thanks for reading and have a great day!


Starting a YouTube Beauty Channel: Things you should know


Hello everyone! I hope this post finds you well. Today I have some pointers for you on starting a YouTube channel. Now I am not a pro and I don't claim to know everything, but I know what I know and I am going to share what I know with you.

I started my channel Aug 14, 2013 and today being Oct 4, 2013 with 51 subscribers, So that's a Subbie a day so far :).  Now, my channel is a beauty channel, on my channel I do reviews, tutorials and Egg tests.

Whats a egg test? I apply certain makeup products to eggs to test their claims if any on covering pores and what not. This is my niche on my channel. 

Whats a Niche? A Niche is your specialty something that makes you different and sets you apart from the countless others doing the same thing on YouTube. If you don't have a niche find one! 

This can be anything, Like me and my egg. 20/30Glam is apart of the beauty community on YouTube, Their Niche? Each other as far as I have seen They are the only Beauty channel that features Two women, So they can get two views of the same product, So you get to different views, two reviews in one video! kinda like a Siskel and Ebert of beauty and if they play on this I feel they will go very far on YouTube.

Now that you have considered what makes you different from all other beauty channels lets talk Brand.
Whats a Brand? You are your Brand. What you say, how you say it and how you look while you say it is apart of your brand. Don't try to be like every one else use your quirks, the things that make you, You.
Have a southern drawl? use it! Have a cute accent? Don't hide it! Use what you got. 

Now, not everyone is going to fall in love with you, but that's okay too. Haters will come and haters will go, but like Madonna said "Any publicity is good publicity". Example Mirandasings08 from YouTube her channel has many haters, but people watch just to see her madness and see what the haters have to say to her in the comments section of her videos and she responds to them through her videos, she basically used her haters to get ahead and it worked flawlessly.

Lighting! Even if you have a cheap camera or webcam your lighting can make it look so much better.
I use clamp lights from the hardware store and GE reveal light bulbs. I cover them with a white shower cap as a light softener.


 I do not point the lights directly at me because it will make me too bright. Point them at the ceiling, light the area your filming in not just your face.

I use the Logitech C615 webcam that I picked up at Walmart for around $60 dollars. It is a good camera and I like what I get from it for now. Sure everyone wants a great camera to film with but sometimes it doesn't work out that way, so just use the best you can afford.


I have made my background using a poster board from Walmart and wrapping paper from Walgreen's, taped it to a old mop duster stick. I did this because I have a 2 year old, so I have to film when I can and not when I want. And this helps me set up whenever I need it and I don't have to worry about the mess in the background.

Time! Time is a very important factor. If you are a new channel no one wants to see 15 minuets of you blending out your eye shadow or hear about how you love the Naked2 palette. Keep your videos around or under 10 minuets. Once you gain an audience then you can do longer videos because people have subscribe and are obviously interested in what you have to say. 


When it comes to eye tutorials, this I have learned from my own experience if you are doing a whole look do only 1 eye and cut to to finished look. Be sure to record your intro after you have completed your look so they can get an idea of the finished look before the tutorial portion starts so you can get a good intro to your video.

Think of it this way, in every movie blockbuster there are at least 5 trailer scenes. This means there are 5 attention grabbing scenes in every movie, this sells the film so people will buy tickets. ever wonder why the trailer is better then the movie as a whole? But instead of an hour and a half you get 5 to 15 minuets to sell your brand e.g YOU!


So catch your audience within the first 20 seconds then go from there every so often drop a trailer spot, this could be doing something different in the look your doing or showing them a different product, if your doing a review. So don't linger. Remember you have a video bar next to your face screaming watch me instead. So do your thing to keep the viewers eyes on you! :)

Edit your videos and edit them again. Get rid of all those ums. I little trick I am working on is to say everything 3 times and space out my phrases, like this. "this is the new beauty product of the month". Then stop. Don't say "this is the new beauty product and i love um what it does um for my skin". This will be harder to edit. Think of it as a commercial, make your statements and phrases as clear as possible.

When doing a voice over there is no need to keep talking all the way through. Say what is needed and nothing more, if it is funny or pertaining to the video then its alright. Add music to the video for the times you aren't talking, this will help move the video along, make sure its copyright free or YouTube will hate you and spit on your video!


Don't save your video as MyMovie.file.  Name it! YouTube uses this file name as a guide for what your video is about so name it the same way you want it to appear on YouTube itself. 

Don't Yell in your video most people watch YouTube with head phones on and a screaming voice is a sure way to get a video closed before you get to your subject matter.

Do add tags to your video, relevant to your video. YouTube Currently only allows I think 400 or 500 characters for tags, so use them wisely.

Do add big Beauty channels to your tags I currently use Michelle Phan and Kandee Johnson in my tags to show up on the side of their videos. 

Do add your channel name to your tags, this will help your other videos show up on the side while someone is watching your current video.

Do use annotations to ask your views for likes, subscriptions and comments, engage your audience.


Always ask for Likes, comments and subscriptions at the end of every video. Kandee Johnson always mentions a hug after her videos, GossmakeupArtist Always winks at the end of his videos. I haven't found my sign off signal yet, but I will one day! So find yours :)

Most Important! Look into the camera! Not the view finder, Not the computer screen. Talk to the camera like you are talking to your friends or family. 

You don't have to be all dolled up for a video, but you should look decent.

I am currently looking for new subscribers!
Please Subscribe if you like and if you have a beauty channel I will subscribe back :)

So that's all my brain can handle for today.

I will be Adding to this series as I go, so Please follow my blog if you like with bloglovin or google+

YouTube Channels I have mentioned above :)
TheMakeupSquid
20/30Glam
Mirandasings
Kandee Johnson
GossMakeupArtist

All Items mentioned above were purchased with my own money at Walmart.

Thanks for readings and have a great day :)


Saturday

Not just a pretty face!

I don't want this blog to be just about a pretty face. I want this blog to be about smart intelligent women who know whats up and how to back it up with the knowledge of with what they are doing. its not enough for me to know what to apply. I want to know how to apply it to my face.

So I am going to start with color. Color can be scary or fun depending on where you want to go. It can be used as an all over shade or just as a liner the choice is yours, but, what colors to choose is just as important.

I am going to explain to you color theory. Color theory isn't just for decorating or painting a canvas.


This is a color wheel.
The color wheel or color circle is the basic tool for combining colors. The first circular color diagram was designed by Sir Isaac Newton in 1666. A color wheel is used to show us what colors compliment each other as well as what colors blend well with each other. We will be using him a lot in this post so say hi to Mr.Wheel :)


As you see to your right and above Mr.Wheel has Red on top and Green on the bottom. What does that mean? It means Red and Green Oppose each other Offering the highest amount of contrast. Now I am not saying if you are wearing Red, add some Green. No, what I am saying is that they contrast each other in the highest way. Look at the Blue in this image, now look over to that yellow on the opposite side. They oppose each other in the color scheme offering the highest contrast. 


Now, if your still reading, we will move on :)


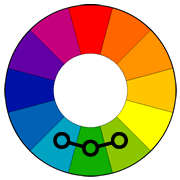
This Image shows us three colors at the bottom of Mr.Wheel.
This is called Analogous color scheme. Analogous color schemes use colors that are next to each other on the color wheel. They usually match well and Blend wonderfully together. This is what most eye shadow trios use to take the guess work out and make it easier on us.This is best for beginners as it is hard to mess up. But, what if I bought the BH cosmetics 88 color palette? Oh, No!


Still here? Good :)


Now, here we have what they call a Triadic color scheme.
A triadic color scheme uses colors that are evenly spaced around the color wheel. Using the form of a even spaced triangle over Mr.Wheel will allow you to see which three colors will work best together providing you choose your main color first. This is what most eye shadow trios use to take the guess work out and make it easier on us.With this method you will never know where you will end up in any eye look. Just make sure to let one color dominate and use the two as accent colors.


Mr.Wheel Can be divided by his warm and cool side
Warm = Open 
Cool = Closed
Thats the best way I can explain it. All of the colors will look great against a white base. But using other colors, this should help give you a better idea of where your going with your look.


If you are still confused? I apologize! I found this nifty little tool online. So you can have your own Color wheel any time! It is originally used for website design, but it uses color theory!  And I love it you can check that out here. colorschemedesigner

Well, I hope this has helped. I am not an expert but this is a theory I use when applying eye shadow.

Let me know what you think and if I went to far out there let me know hehe:)
Thanks for reading and have a great day!


Images source colortiger.com

Thursday

Adventures in winged eye liner

Okay, I admit it. I have a problem flicking, Winging, Cat eyeing my eyes. I think I have a lazy eye that is to lazy to be a real lazy eye. My eyes are different from one another and they are hooded. Over the years I have come up with personal ways to correct this with the illusion of eye shadow.

My eyes are hooded also adding to my problems, I'm not saying I hate my eyes, Because I don't.
I am actually very happy with them once they are done the way I like them. However I do have a problem with a winged liner. You see, right at the outer corner of my eye they take a dip for the worse.

It has taken me years and a lot of trial and error to perfect this and get it down. I am not saying this method is the way everyone should do it. But it works for me to achieve the Look I want.

Some Products I have used to achieve my wing:

Milani Eye Tech Liner
MakeupForever Liquid Aqua Liner

I love the Milani EYE TECH Liquid Liner. It goes on matte, the formula does get dry fast, so what I do is dab some on the back of my hand and dip is into the liquid then apply. It has wonderful staying power although it isn't as dark as I would like it to be, But that isn't nothing a black eye shadow on top wont handle.


Milani.com says: Full color flow thru system that delivers & defines a perfect line in one stroke. Felt tip nib applicator is easy to use, provides precise control with no skipping or pulling.


I do have a problem with the MakeupForever Liquid Aqua Liner. It is too shiny and it makes my liner looked like black wrinkled foil. It does irritate My eye some but Learned to use it as a sealer for my false lashes to cover and blend any unevenness pertaining to my lashes.It does last forever and a day.


Makeupforever.com says: Rich in polymers, this superior eyeliner offers an impeccable hold that guarantees water-, tear-, and smudge-proof color. Its ergonomic, foam-tip applicator is designed to resemble a makeup brush handle for the quickest, easiest, and most accurate application.


Some of my buddies from Youtube have suggested I do a tutorial on how I wing my liner. But it isn't an actual wing, I like to call it an illusion of a wing. I will be calling the tutorial "How to fake a cat eye".

I hope it will be useful and helpful to some people who find this hard or difficult to do.
After all that's what makeup is right? Mute this, emphasize that? So that's what I am doing today.

Once I get the Video up I will be adding a Link to it on this Post. Wish me Luck!

Have you tired these liners?
What are your thought on them?

Thanks for stopping by, May all your looks be flawless! :)


Saturday

How to blend eye shadow


Blending colors together can be difficult at times leaving you with a muddy, muted look, but there is a technique that you can use to practice blending your colors.


What you will need to practice this technique:

Black eye shadow
White eye shadow
A large shader brush
A pencil brush
A tapered blending brush

If you can blend black and white together you can blend any colors together.
Leaving you with  a nice gradient of color movement.

I have demonstrated this technique in the video below so you can see how its done. Happy blending!


Let me know what you guys think?